


Arduino is a microcontroller that can be used for various purposes. It can be programmed to interact with different components and devices, including the 16×2 LCD display. In this blog post, we will explore how to interface an Arduino with a 16×2 LCD display.
Materials Required:
To interface the 16×2 LCD display with Arduino, we need the following components:
- Arduino Board
- 16X2 LCD Display
- Potentiometer (10kΩ)
- Resistor (220Ω)
- Breadboard
- Jumperwire
Circuit Diagram
Before we proceed further, remember we will use the display in a 4-bit configuration so we will be limited to some extent but nothing evident to stop us from building stuff, on the other side this will help us to eliminate a few connections and simplify the circuit.
NOTE:- Pin No. Of LCD from left -->
Just follow the steps below to simplify the process:
- Pin 1 (VSS) of the LCD display is connected to GND on the Arduino board.
- Pin 2 (VDD) of the LCD display is connected to +5V on the Arduino board.
- Pin 3 (VO) of the LCD display is connected to the middle pin of the potentiometer. Other two pins are connected to +5v and the ground of UNO
- Pin 4 (RS) of the LCD display is connected to digital pin 7 on the Arduino board.
- Pin 5 (RW) of the LCD display is connected to GND on the Arduino board.
- Pin 6 (E) of the LCD display is connected to digital pin 6 on the Arduino board.
- Pins 7 to 10 of the LCD display are not used and are left unconnected.
- Pins 11 to 14 (D4 to D7) of the LCD display are connected to digital pins 5, 4, 3, and 2 on the Arduino board, respectively.
- Pins 15 (LED+) and 16 (LED-) are used to control the backlight of the LCD display and are connected to +5V and GND on the Arduino board, respectively.
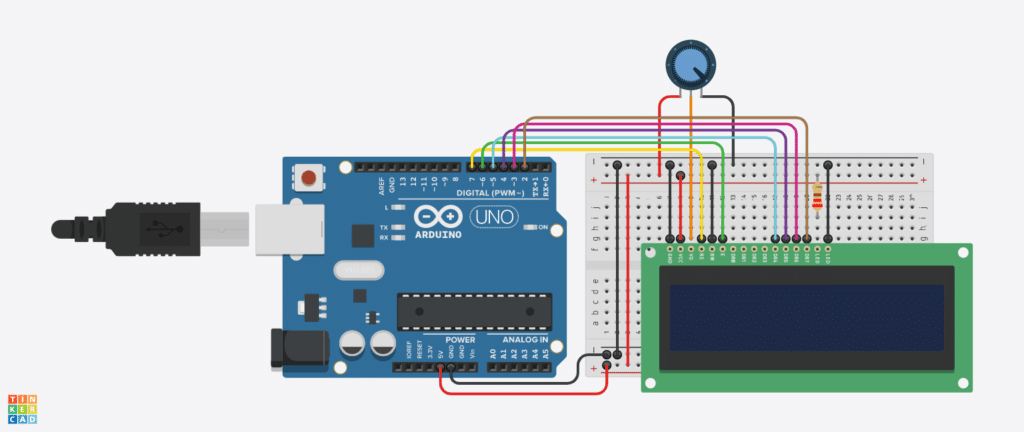
NOTE:- Same code can be used to interface with Arduino NANO with same pin connections only, Basically Nano is Uno on smaller footprint, so their GPIO pins work same.
Read More: Fun With Arduino and Buzzer: Basic, Siren, Morse, Melody
Installing Library:
The codes are written to work with “LiquidCrystal” library from Arduino & Adafruit, so you need to install the library in IDE before you upload the code to your development board. This library work with most of Arduino Boards, read library page for more details
Follow the steps below to install this library into IDE:-
- Click on the Media Library icon in the left menu.
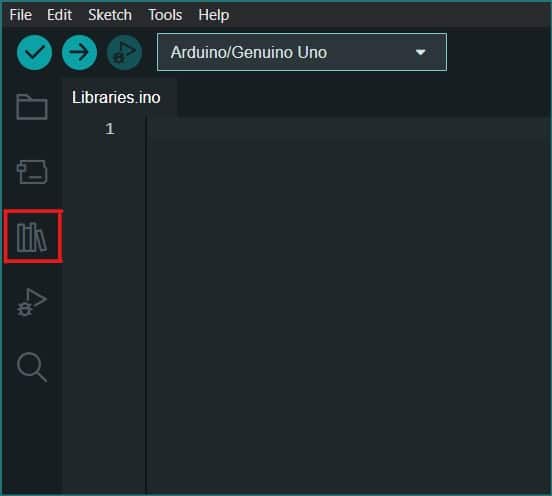

2. Search for “LiquidCrystal” verify the library from the image and click on install.
3. Don’t forget to verify the installation of library before you proceed further

Programming:
Now, we will look at the code required to interface the 16×2 LCD display with the Arduino board. Here are two examples of the code.
Basic Interfacing Code:
This code is to understand basic functions present in the library to display a simple “Hello World” message.
#include <LiquidCrystal.h>

//initialize the library with the numbers of the interface pins
LiquidCrystal lcd(7, 6, 5, 4, 3, 2);

void setup() {
  // set up the LCD's number of columns and rows
  lcd.begin(16, 2);

  // Print a message to the LCD.
  lcd.print("Hello World!");
}

void loop() {
  // Do nothing
}- First, the library is included at the beginning of the sketch using
#include <LiquidCrystal.h> - Next, a
LiquidCrystalobject is created and initialized with the pin numbers of the Arduino board that are connected to the LCD display. - The numbers in the parentheses represent the RS, E, D4, D5, D6, and D7 pins of the LCD respectively, which are connected to the corresponding pins on the Arduino board.
- In the
setup()function, the number of columns and rows of the LCD display are set usinglcd.begin(16, 2). - Finally, a message is printed to the LCD display using
lcd.print("Hello World!"). - The
loop()function is not used for anything.
Simulation (Testing)
This simulation will help to understand the use and effect of the potentiometer on the contrast you can play around with it and check the effect for yourself.
Note:- Use Website on PC for better compatibilty in simulation
Using 2 Lines
This code will help to understand using both lines/rows of liquid crystal display.
#include <LiquidCrystal.h>

//initialize the library with the numbers of the interface pins
LiquidCrystal lcd(7, 6, 5, 4, 3, 2);

void setup() {
  // set up the LCD's number of columns and rows
  lcd.begin(16, 2);

  // Print messages to the LCD.
  lcd.print("Welcome To :- ");
  lcd.setCursor(0, 1);
  lcd.print("eshelp.org");
}

void loop() {
  // Do nothing
}
TASK:- Refer to the description of the first code and on the basis of your understanding comment down, the description of this code. This simple task will help you to understand basics of 16×2 LCD thoroughly.
Simulation (Testing)
Application:
The 16×2 LCD display interfacing with Arduino can be used in various projects, such as home automation, robotics, weather stations, and many more.
Summary:
Interfacing the 16×2 LCD display with Arduino is an easy and fun project that can be used in various applications. With the help of the code examples provided in this post, you can easily get started with your own project. So, start exploring the possibilities and have fun!


