


Blinking an LED with Arduino is one of the simplest and most popular projects you can do with the microcontroller. In this tutorial, we’ll go over the steps required to set up a simple circuit and write code to make an LED blink on and off also go through an inbuilt example to blink led on Arduino boards
Materials Required
To get started, you’ll need the following materials:
- An Arduino board (any model will work)
- An LED
- A 220-ohm resistor
- A breadboard
- Jumper wires
Method 1- External Led Required
Setting Up the Circuit
The first step is to set up the circuit on the breadboard. Follow these steps to do so:

1. Insert the LED into the breadboard, making sure the longer leg (the anode) is on the side with the “+” symbol.
2. Connect a resistor from the anode of the LED to pin “12” on the Arduino board.


3. Connect a jumper wire from the cathode of the LED to the “GND” pin on the Arduino board.
4. You are done!
Your circuit should look something like this:
Writing the Code
Now that the circuit is set up, it’s time to write the code that will make the LED blink on and off. Follow these steps to write the code:
- Open the Arduino IDE (integrated development environment).
- Create a new sketch.
- Type the following code into the sketch:
void setup()
{
  pinMode(12, OUTPUT);
}

void loop()
{
  digitalWrite(12, HIGH);
  delay(1000); // Wait for 1000 millisecond(s)
  digitalWrite(12, LOW);
  delay(1000); // Wait for 1000 millisecond(s)
}
4. Save the sketch.
Let’s go over what this code does. In the setup() function, we set pin 12 as an output. This tells the Arduino that we’ll be sending data to that pin.
In the loop() function, we first turn on the LED by setting pin 13 to HIGH. We then wait for one second using the delay() function. After one second, we turn off the LED by setting pin 13 to LOW, and wait for another second using delay(). This process repeats indefinitely, causing the LED to blink on and off.
Method 2-(No Circuit Required)-Easy
No circuit is required in the following process.
As this example uses an inbuilt led connected to pin 13 of Arduino.
Importing The Blink Example
1. After opening IDE click On “File”–>”Examples”–>”01.Basics”–>>”Blink”

2. You will see a new window opened with the name “Blink.ino”
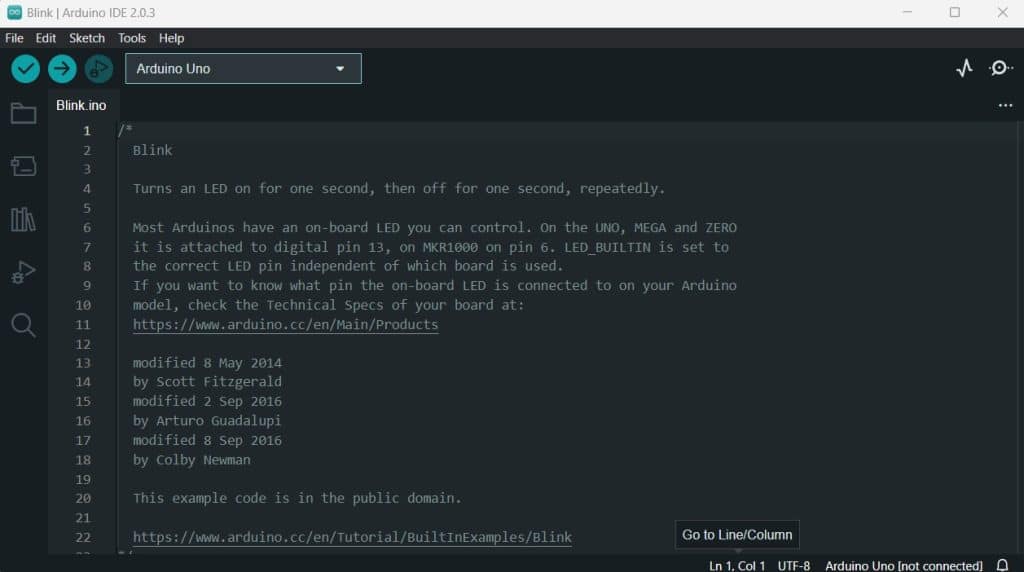
3. Save the sketch
Next are some common steps for both the methods
Uploading the Code
Now that the code is written, it’s time to upload it to the Arduino board. Follow these steps to do so:
- Connect the Arduino board to your computer using a USB cable.
- In the Arduino IDE, select the correct board type.
- Click the “Upload” button in the IDE.
If everything is set up correctly, the IDE should compile the code and upload it to the board. You should see a progress bar at the bottom of the IDE, and the LED should start blinking on and off.
Kudos! You Have Learnt About the Basics of Arduino IDE and few inbuilt functions of Arduino like delay,digitalWrite,pinMode,etc.
Conclusion
Blinking an LED with Arduino is a simple but satisfying project that’s perfect for beginners. Now that you’ve completed this project, you should have a good understanding of how to set up a basic circuit and write code to control it. Try experimenting with different LEDs, resistors, and code to see what other effects you can create!
NOTE:- If you come across any issues let me know in comments, I will be happy to resolve it for you. Major issues could be with clone boards ( you will require proper version of "AVR Boards Manager" to make them work)
Additional Resources
If you’re interested in learning more about Arduino or electronics in general, here are some additional resources you might find helpful:
- Arduino official website: The official website for the Arduino project, featuring documentation, tutorials, and a community forum.
- Quartz Components: An online retailer of electronics components, as well as a provider of educational resources and tutorials.
Also Check:


